Rewby, for helping me understand some of the odder bits and bobs of NFX250 behaviour.
Thanks again!
Hardware
Hardware description
The NFX250 is a weird, weird animal in the world of enterprise network gear. It’s not quite a switch, not quite a router, but rather a switch, a router and a virtualisation platform, all-in-one.
This uniqueness also leads to them being quite cheap on eBay and other “e-waste recycling platforms” – you can get one for less than 100 EUR if you’re lucky!
Front Ports: The device comes with 8x RJ45 1GbE ports in a block, a group of 2x 1GbE dual-media (RJ45 and SFP) ports and 2x 10GbE SFP+ ports. Each dual-media port is only active when either RJ45 or SFP module is plugged into it, and only one can be active for each port.
The front ports are numbered as ge-0/0/[0-11] and xe-0/0/[12-13].
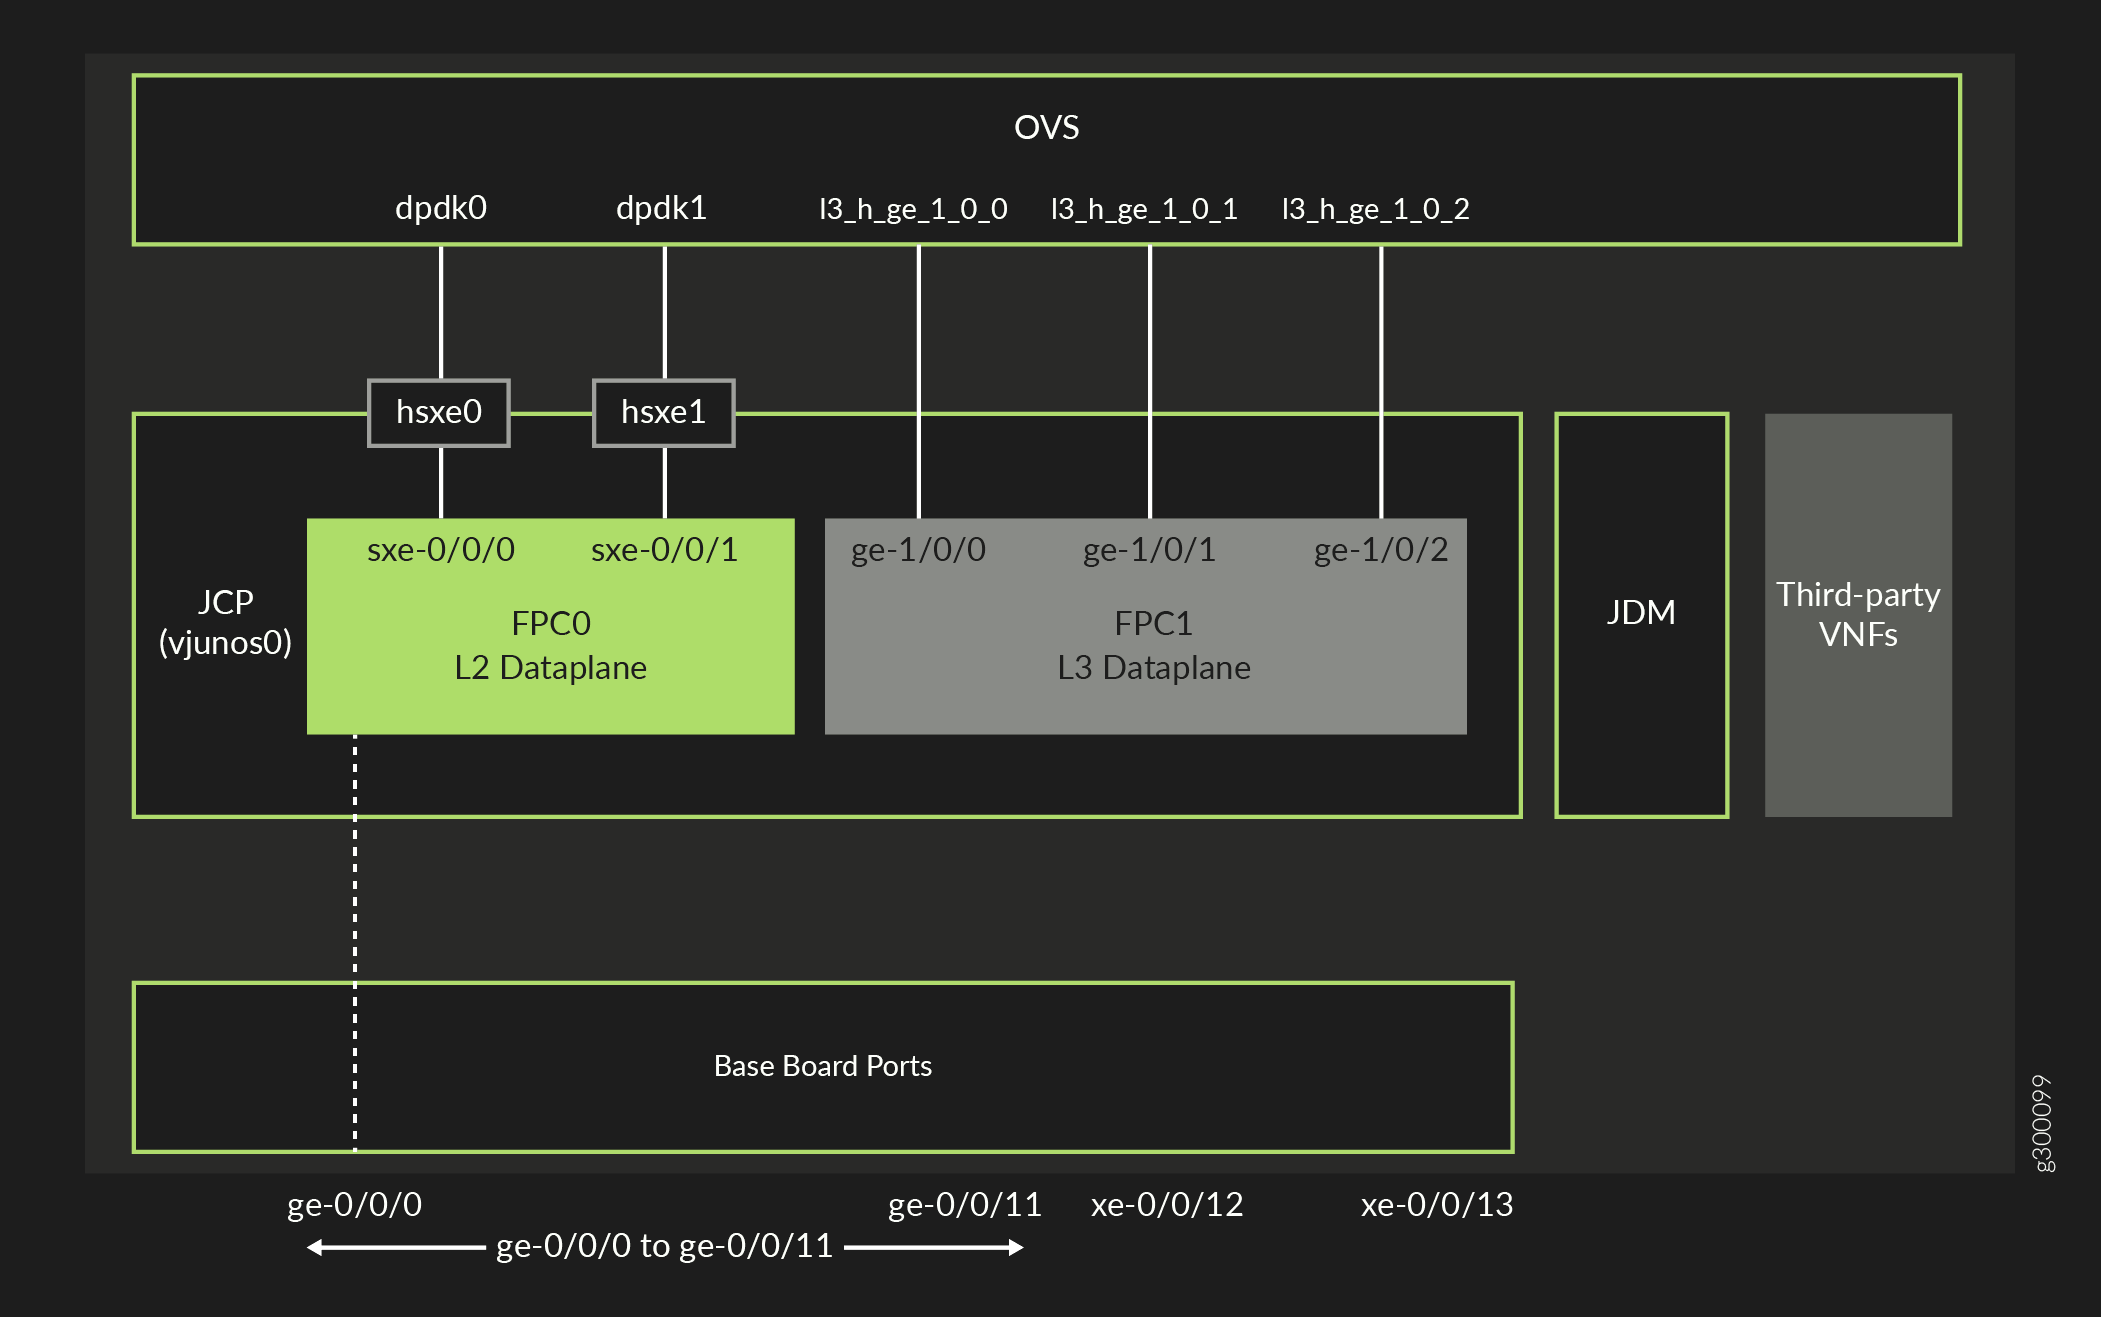
Networking Internals: All the front ports (except for management) are wired into FPC0, this is a physical PFE located on the board, a Broadcom switch chip. Consider this an “EX switch”.
Additionally, 2x 10GbE Intel X552 NICs of the routing engine (RE) are connected to the Broadcom switch chip (labelled as sxe-0/0/[0-1], or hsxe[0-1] on the RE itself).
Management: A 1GbE fxp0 management port (directly connected to the RE) and a serial console port (9600 baud, 8N1) are available.
CPU: The heart of the RE is an Intel Broadwell Xeon-D processor, which is good enough for forwarding and routing traffic, but not really designed for compute-heavy tasks. Sadly, this is soldered on, and cannot be swapped out for a more performant variant.
RAM: The board has 4 DIMM slots for DDR4 ECC RAM, and comes with a minimum of 16GB of RAM installed (2x8GB RAM sticks). The exact model is ‘sk Hynix DDR4 ECC 8GB 1Rx8 PC4-2400T-RD1-11’.
Storage: The board has 3 M.2 2260 SATA SSD slots, of which one is populated by default.
Hardware specs
Based on the hardware SKU, you might end up with a lower or higher-specced NFX.
SKU
CPU
Cores/Threads
RAM
Storage
NFX250-LS1
Xeon-D D1517 @ 1.60GHz
4c/8t
16GB
100GB
NFX250-S1
Xeon-D D1528 @ 1.90GHz
6c/12t
16GB
100GB
NFX250-S2
Xeon-D D1528 @ 1.90GHz
6c/12t
32GB
400GB
NFX250-S1E
Skylake Xeon ?
6c/12t
16GB
200GB
AT&T FlexWare
The NFX250s are also sold rebranded as AT&T FlexWare “universal CPEs”.
Other than the paint job and a different factory-default configuration being applied, these are identical to the equivalent Juniper NFX models.
AT&T FlexWare SKU
Juniper SKU
U210
NFX250-LS1
U410
NFX250-S1
U412
NFX250-S2
U800
Likely NFX350 or NFX250-S1E
Again, weird nondescript box, especially with the AT&T logo on it instead of Juniper’s own: can be had for cheap in the right places!
Hardware mods
You can mess with a few things inside the NFX250:
The RAM can be upgraded to 32GB by inserting two more 8GB sticks, bumping you up to the highest SKU.
The storage can likely be swapped, but I haven’t tested this yet. Do note that Junos will only use and partition the first disk.
The fans are standard 40x40x20mm 4-pin PWM fans with a standard pin-out. The connector is standard, save for a different keying – you will need to snip or sand off a notch from the plug.
/// warning
        This box runs hot!

This is due to the nature of vSRX/vMX, which are DPDK userspace network applications, where the receive/transmit threads always pegs the assigned CPU core at 100%.

I would personally not recommend a Noctua 6k RPM silent fan mod, a popular choice for homelabbers. Instead, look for Sunon’s Maglev line or Arctic’s 15k RPM server fans, which have a less grating sound, yet still effectively cool the unit.
Software
Architecture
The software architecture consists of a Linux host/hypervisor running JDM in a container, which is essentially a wrapper over libvirt. The NFX’s main purpose is to run VNFs, or VMs in simpler terms. It should not be a surprise that Junos is also deployed as a VNF, sort of.
By default, a vjunos0 “control plane” VM is deployed on the platform, which cannot be removed. This vjunos0 is a vSRX for all intents and purposes, and manages the Broadcom switch chip FPC0, as well as its own dataplane, FPC1.
As mentioned before, FPC0 is connected to the host via 2x Intel 10GbE NICs (sxe-0/0/0 and sxe-0/0/1), which are SR-IOV and DPDK-capable. Linux OpenvSwitch is used to tie together FPC0 and FPC1.
The vSRX dataplane connects to OpenvSwitch via its ge-1/0/[0]-2 interfaces, but these interfaces can also be directly bound to the Intel 10GbE NICs by assigning them to SR-IOV functions. This is useful in case you don’t really want to pass any traffic at all to VNFs hosted on the NFX, and would rather make full use of the vSRX vjunos0’s routing and forwarding capabilities.
How does the NFX map traffic from say, front port ge-0/0/0 to a specific VM, given that it only has 2x 10GbE direct connectivity to the switch chip? It’s a quite dumb, but straightforward solution: just mark the incoming traffic with VLAN tags! sxe-0/0/[0-1], in most cases, will just act as a VLAN trunk, and OpenvSwitch can direct traffic to the intended VMs by just setting the VLAN membership on the VM interfaces.
Initial boot, original vs. NextGen versions
Since I have procured an AT&T U210 (aka NFX250-LS1) from the wonderful world of eBay e-waste resellers, I will be documenting what I saw on this specific box (or SKU).
First of all, there are two different software architectures you might encounter when using an NFX – the original and “NextGen”.
The original architecture had the users logging into the Linux host running JDM, from which they could ssh vjunos0 to access the control plane. If you see Ubuntu 14.04 or any JunOS versions below 19.1, you will be dealing with this architecture.
I would strongly recommend you to upgrade to a newer version. This can easily be done by procuring the NFX250 USB install image, flashing it onto a USB disk, and following the USB install procedure. Information about the current JTAC recommended image (which is likely the most stable image) can be found here.
The installation procedure takes about 20-30 minutes.
/// tip
There’s no special sauce involved in installing Junos from a USB disk — feel free to play around with different versions of the NFX software, you can always re-install and put your config back on it!
The next-gen architecture, while it looks very similar (JDM on a Linux hypervisor, vjunos0 as a FreeBSD/vSRX VM), it logs you straight into the vjunos0 instance after the NFX finishes booting, and lets you do both VM management operations and interface/control-plane configuration from inside the vjunos0 shell. This is where we will meet once you have reinstalled the software!
Factory defaulting the factory default configuration
Feel free to skip this section if your box says Juniper on it!
If you are using an AT&T FlexWare device, you will be surprised to find that after the initial install, while the prompt shows as Amnesiac (meaning factory-default configuration), you cannot log in with root!
Additionally, you might see a long scary MOTD message and disclaimer courtesy of a certain Company™.
In this case, you will need to perform a bit of frickling to get the device back into a usable state. We are going to be resetting the password, and getting rid of the bits of config that prevents you from logging in. Let’s follow the password reset procedure together.
Reboot the box by flipping the switch on the back. Watch the console output… you need to hit Ctrl+C, but not too early (breaking the boot), and not too late (where the input is no longer accepted).
The linked guide is a bit misleading on this, as this part is too early to be hitting Ctrl+C on!
Checking Prerequisites
jdm docker container is in Exit state, required to cleanup, please wait...
9dba6935234b
[  OK  ]
Launching jdm container 'jdm'...
Here, JDM might decide that it needs to clean up some space, and instead of launching the container, it will reload the JDM Docker image. Wait until you see this OK pop up after the container image ID!
Launching jdm container 'jdm'...
64501f708bce423cbd1a39de808186616c96d025ac6a4a4bc894b161fe108c0c
OK
Follow the rest of the password reset procedure, paying attention to:
Change the root password by issuing set system root-authentication plain-text-password after entering configuration mode.
Delete the phone-home, name-server, login, motd and scripts items inside the [edit system] stanza.
Important: Do not touch any other config sections for now!
Do not run commit check, as it will reboot the box.
Commit the changed config, and then do a request system configuration rescue save before exiting from operational mode. It seems like this disables the trigger for the factory-default Company™ to be loaded on at every boot.
Once the reboot runs through and you are able to log in, you can start clearing out the rest of the factory configuration.
/// info
        There are two special bits of config that need extra precaution before removing:

The configuration under [edit system memory], where hugepages are allocated.
And the configuration under [edit vmhost mode], where the NFX’s performance mode is set.
Out of the box, the AT&T U210 comes with a custom flex performance mode the Company™ factory configuration ships with, where only a minimum amount of resources are allocated to the control-plane, and most of the L3 functionality the vSRX otherwise provides is disabled.
To switch to throughput mode, unlocking all capabilities and maximising the throughput of the vjunos0 vSRX, you need to:
Switch to configuration mode and make sure you have no unnecessary config under: [edit interfaces], [edit firewall], [edit routing-options], [edit protocols], [edit security]. Make sure to leave the [edit vmhost] section as is!
Delete the hugepage allocation configuration under [edit system memory].
Set the mapping of the ge-1/0/[1-2] vSRX dataplane interfaces to be directly mapped to hsxe0 and hsxe1, respectively (this assigns the interfaces the SR-IOV functions of the NICs).
You can do this by doing a load patch terminal and pasting configuration this bit in:
After committing, issue the request vmhost mode throughput command in operational mode to switch the the throughput performance mode. This will prompt you to reboot, let it do so.
Comparing the two performance modes, here are the expected outputs:
Before changing the NFX performance mode:
> show vmhost mode
Mode:
--------
Current Mode: flex

CPU Allocations:
Name                                 Configured          Used
----------------------------------------------------------------
Junos Control Plane                  0-1                 0-2
Juniper Device Manager               1                   1
LTE                                  0                   -
NFV Backplane Control Path           5                   5
NFV Backplane Data Path              4                   4
Layer 2 Control Path                 -                   -
Layer 2 Data Path                    -                   -
Layer 3 Control Path                 1                   -
Layer 3 Data Path                    5                   -
CPUs available for VNFs              2-3,6-7             -
CPUs turned off                      -                   -

Memory Allocations:
Name                                 Configured          Used
----------------------------------------------------------------
Junos Control Plane (mB)             1536                1538
NFV Backplane 1G hugepages           1                   1
NFV Backplane 2M hugepages           -                   0
Layer 2 1G hugepages                 -                   -
Layer 2 2M hugepages                 -                   -
Layer 3 1G hugepages                 -                   -
Layer 3 2M hugepages                 282                 -
VNF max memory limit (gB) (approx)   9                   -
After changing the NFX performance mode to throughput:
> show vmhost mode
Mode:
--------
Current Mode: throughput
CPU Allocations:
Name                                 Configured          Used
----------------------------------------------------------------
Junos Control Plane                  4                   4
Juniper Device Manager               4                   4
LTE                                  4                   -
NFV Backplane Control Path           4                   0,4
NFV Backplane Data Path              -                   -
Layer 2 Control Path                 -                   -
Layer 2 Data Path                    -                   -
Layer 3 Control Path                 0                   0
Layer 3 Data Path                    2-3                 2-3
CPUs available for VNFs              -                   -
CPUs turned off                      1,5-7               -

Memory Allocations:
Name                                 Configured          Used
----------------------------------------------------------------
Junos Control Plane (mB)             2048                1994
NFV Backplane 1G hugepages           -                   0
NFV Backplane 2M hugepages           -                   0
Layer 2 1G hugepages                 -                   -
Layer 2 2M hugepages                 -                   -
Layer 3 1G hugepages                 1                   1
Layer 3 2M hugepages                 1376                1375
VNF max memory limit (gB) (approx)   -                   -
MX250, erm, MX150
The MX150 is a 20 Gbps MX software router that looks very much like an NFX250, except with a slightly different label on it. In fact, it is exactly the same hardware as the NFX250-S2 SKU!
Can we use this to our advantage? Sure we can, let’s turn our NFX250 into an MX250!
If you happen to have an NFX250-S2, consider yourself lucky, since you don’t need to do any of this at at all! Just insert the USB installer and let it run through.
This is due to the fact that the NFX250-S2 and MX150 are one and the same SKU, except with a different stickers on the unit.
Otherwise, keep on reading!
Installing MX150 software on an NFX250
The following is a quick guide to follow along to get your NFX250 to be a very, very smart router, considerably smarter than what the vjunos0 vSRX the NFX image comes it is capable of.
Start the MX150 USB installer (you can download this from the Juniper support website, dd or BalenaEtcher the installer.img onto a USB drive). Smash that Esc key to get into the BIOS during boot, and in the boot manager, select your USB drive to boot from.
In the Grub menu, edit the “Install Juniper Linux” item (arrow keys to select, e to edit), and add mkpart as part of the kernel command line, after quiet. Adding this option will force the installer to repartition the disk to the MX150 partition scheme, a step that would normally be skipped, eventually leading to the installer running out of space mid-install.
Press Ctrl+X to start booting with the modified kernel command line.
After the installer reboots for the first time, during POST, keep pressing Esc to get to the boot menu once again. Select the USB drive again as a boot device. In Grub, select ‘Boot to Host Shell’.
This will drop you into a Bash shell running from the USB installer’s initrd, using which we will make some changes to the installed files before the second phase of the Junos install runs through.
Hey, those are our model SKUs! The 0c98 config is a bit special, since that’s the MX150’s config, and comes with a different PVI database (a Juniper proprietary key-value store), namely one populated with MX150 entries.
We want these!
Replace your NFX250 config (in my case, LS1 corresponds to 0c9b) with the MX150 config (0c98):
rm -rf ./0c9b
cp -r ./0c98 ./0c9b
At this point, you will also want to change the memory allocated to the control plane VM. Feel free to skip this step if you have a 32GB memory model or already upgraded to it!
If you have any models except the LS1, skip this step! Otherwise, you will also have to change core mappings in ./rc.platform-config, as that SKU does not have 12 vCPUs available to assign:
Finally, we finish our work with regenerating hashes in the /mnt/jvar/platforms-supported directory and sync to disk:
find -type f \( -not -name "hash.md5"\) -exec md5sum '{}'\; > hash.md5
cd /
sync
umount /mnt/jroot
umount /mnt/jvar
Reboot the NFX by toggling the switch on the back, remove the USB drive, and let the system boot normally again, where it will finish the installation procedure.
/// note
The box will restart at least one more time, and the vMX VM itself will also go through a reboot cycle, and then finally normally boot. It’s all good, no need to worry about it!
Once you have a login prompt, go ahead, and log in, check out the result of your handiwork!
And your data plane (or vFPC in Juniper parlance) should be working fine and showing you interfaces:
> show interfaces terse | match "ge|xe"
ge-0/0/0                up    down
ge-0/0/0.16386          up    down
ge-0/0/1                up    down
ge-0/0/1.16386          up    down
ge-0/0/2                up    down
ge-0/0/2.0              up    down
ge-0/0/3                up    down
ge-0/0/3.16386          up    down
ge-0/0/4                up    down
ge-0/0/4.16386          up    down
ge-0/0/5                up    down
ge-0/0/5.16386          up    down
ge-0/0/6                up    down
ge-0/0/6.16386          up    down
ge-0/0/7                up    down
ge-0/0/7.16386          up    down
ge-0/0/8                up    down
ge-0/0/8.16386          up    down
ge-0/0/9                up    down
ge-0/0/9.16386          up    down
xe-0/0/12               up    down
xe-0/0/12.16386         up    down
xe-0/0/13               up    down
xe-0/0/13.16386         up    down
(Note: xe-0/0/12 and 13 show up here because I had SFP+ transceivers inserted)
Set a root password and get rid of the auto image upgrade spamming your console by setting the following two values in configuration mode:
set system root-authentication plain-text-password
delete chassis auto-image-upgrade
Commit…
… and you have a working MX150, or rather, your very own MX250 to play around with!
MX250 troubleshooting
At this point you can also log in via SSH if you wish to. It’s probably a better idea to do so!
Missing data plane interfaces (only on -LS1 models)
If you are missing the front port data plane interfaces (ge-0/0/0-9), and your vFPC does not show up in show chassis hardware:
> show chassis hardware
Hardware inventory:
Item             Version  Part number  Serial number     Description
Chassis                                DFxxxxxxxxxx      NFX250-ATT-LS1
Midplane         REV 07   650-070886   DFxxxxxxxxxx      NFX250-ATT-LS1
Power Supply 0
Routing Engine 0                                         RE-VMX
CB 0                                                     VMX SCB
FPC 0                     BUILTIN      BUILTIN           Virtual FPC
  CPU                                                    <<<<<<<<<<< You should see a MIC 0/PIC 0
Fan Tray 0                                               fan-ctrl-0 0, Front to Back Airflow - AFO
Fan Tray 1                                               fan-ctrl-0 1, Front to Back Airflow - AFO
and shows as ‘Testing’ in show chassis fpc:
> show chassis fpc
                     Temp  CPU Utilization (%)   CPU Utilization (%)  Memory    Utilization (%)
Slot State            (C)  Total  Interrupt      1min   5min   15min  DRAM (MB) Heap     Buffer
  0  Online           Testing   3         0        3      1      0      1        13          0
you likely have a downspecced CPU and haven’t reallocated the cores, and the vFPC is failing to start.
This is easy to fix even after the install is done!
We’re going to SSH to the host OS to modify the core mapping of the vMX emulated Trio dataplane (RIOT), as we have 8 cores rather than 12.
root> ssh root@192.168.1.1 routing-instance __juniper_private4__
The authenticity of host '192.168.1.1 (192.168.1.1)' can't be established.
ED25519 key fingerprint is SHA256:lWmfKJNZ4Xdv8P+ETFV+nQBzgssc+YEE9uxBIKejuF8.
This key is not known by any other names.
Are you sure you want to continue connecting (yes/no/[fingerprint])? yes
Warning: Permanently added '192.168.1.1' (ED25519) to the list of known hosts.

root@localhost:~#
Change the core mappings and fix the config files already generated/installed:
cd /var/platforms-supported
# See required changes above for LS1vi ./rc.platform-config
# Fix hashesfind -type f \( -not -name "hash.md5"\) -exec md5sum '{}'\; > hash.md5
# Change the platform-config init file on the disk:cp ./rc.platform-config /etc/init.d/rc.platform-config
# Change core mappings in generated vFPC core mapping configvi /usr/share/pfe/core_mapping.cfg
Start the vFPC again by restarting the mpcsd service:
/etc/init.d/mpcsd restart
You should see that the mpcsd logs end with the following:
/var/log/mpcsd.log
Unable to open config file /etc/riot/shadow
2025-02-06T14:21:52.922763+00:00 localhost mpcsd: Changed state from 9 to 6
2025-02-06T14:21:52.922772+00:00 localhost mpcsd: Changed state from 6 to 9
rcp: /usr/share/pfe/: not a regular file
2025-02-06T14:21:55.448648+00:00 localhost mpcsd: Failed to copy  using RCP in 2 trials
0x0BAA
int: error fetching interface information: Device not found
cat: /etc/vmxt/init.conf: No such file or directory
cat: /boot/loader.conf: No such file or directory
cat: /etc/vmxt/init.conf: No such file or directory
cat: /boot/loader.conf: No such file or directory
cat: /etc/vmxt/init.conf: No such file or directory
cat: /boot/loader.conf: No such file or directory
cat: /etc/vmxt/init.conf: No such file or directory
cat: /boot/loader.conf: No such file or directory
If you still see the logs ending with the pfe command giving you its usage info, then your core mappings are not correct. Otherwise, you should have a working data plane!
Exiting back to the vMX control plane shell, we should be able to see the vMX vFPC in Performance mode:
> show chassis hardware
Hardware inventory:
Item             Version  Part number  Serial number     Description
Chassis                                DFxxxxxxxxxx      NFX250-ATT-LS1
Midplane         REV 03   650-070886   DFxxxxxxxxxx      NFX250-ATT-LS1
Power Supply 0
Routing Engine 0                                         RE-VMX
CB 0                                                     VMX SCB
FPC 0                     BUILTIN      BUILTIN           Virtual FPC
  CPU            Rev. 1.0 RIOT-PERF    BUILTIN
  MIC 0                                                  Virtual
    PIC 0                 BUILTIN      BUILTIN           Virtual
      Xcvr 12    850nm    740-021308   F79xxxx           SFP+-10G-SR
      Xcvr 13    850nm    740-021308   F79xxxx           SFP+-10G-SR
Fan Tray 0                                               fan-ctrl-0 0, Front to Back Airflow - AFO
Fan Tray 1                                               fan-ctrl-0 1, Front to Back Airflow - AFO
> show chassis fpc 0 detail
Slot 0 information:
  State                               Online
  Temperature                      33 degrees C / 91 degrees F
  Total CPU DRAM                 2047 MB
  Total RLDRAM                     10 MB
  Total DDR DRAM                    0 MB
  FIPS Capable                        False
  FIPS Mode                           False
  Start time                          2025-02-06 14:21:57 UTC
  Uptime                              2 minutes, 9 seconds
Slow throughput
If you get slow throughput, like in the iPerf below, that indicates that while your vMX booted okay and the vFPC core mappings are correct, for some reason, your vMX does not realize it is running on an NFX250^WMX150.
Notice that we have about 100 Mbps throughput, this is an artificial limitation!
This shows even better when performing an unidirectional UDP iPerf test.
This is not what we want to see here. This means you didn’t copy the right platform directory to your model’s directory during install.
The only way I have to found to deal with this issue is to fully reinstall, since the PVI database is populated during one of the install phases.
Correct throughput should look something like this, on a copper Gigabit port: